The ins and outs of 3D printing and rapid prototyping
Three-dimensional (3D) technologies and services for rapid prototyping have become more affordable over the last decade.
Now is the time to take advantage of them during the packaging design process. Whether it's with in-house equipment or through outsourcing partnerships, you will want to inspire and communicate to your customers what's possible in a cost-effective and timely manner with these technologies.
There are multiple benefits of using 3D printing and other rapid prototyping technologies to create packaging mockups and renderings:
• Speed: You can quickly turn around packaging designs and get them in your hands before they're real. With a simple computer-aided design (CAD) program and a 3D printer, you can design and print with low risk—which means you can also quickly incorporate consumer feedback.
• Cost: These technologies are becoming more affordable and relatively minimal investments can be made on a variety of technologies. Some 3D printers out there now start as low as $300. However, depending on your specific needs, you might require a more expensive system that can print in finer detail or produce larger parts.
• Design freedom: It's quick and efficient to create multiple iterations of a project, sketch or rendering. Another benefit is that you can maintain your intellectual property if you aren't ready to share your designs with the world yet.
Many 3D printers today are not just used for prototyping; they're also used in production settings. Accurate, production-quality parts can now be printed in hours or days to replace the old machined parts that sometimes took weeks to produce and ship. Some of these 3D-printed parts can be made with the same or like materials, and can push the design envelope compared to traditionally machined parts. Currently, NASA is 3D printing certain rocket parts that would normally have been machined and welded together. This saves the time and expense required in the past for complex forming and welding assembly operations to create these parts.
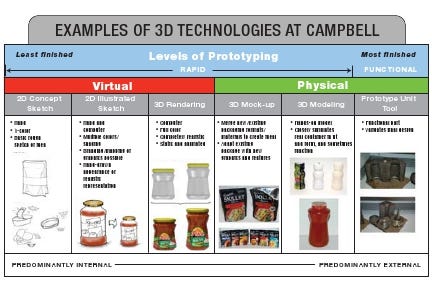
The graphic below charts how Campbell Soup Co. uses different 3D technologies for internal ideation and package prototyping. From left to right, we move from least finished to most finished, from rapid to functional, from virtual to physical.

Campbell 3D technologies chart
Typically, as you move from left to right, costs will increase. And we tend to use outside services as we move further to the right to help properly validate new designs.
This is not necessarily the right way or the wrong way—just the approach we take for packaging at Campbell. And there are other ways to use the available technologies beyond the six shown in the chart.
One of the things that helped us formulate this approach was to make sure that we had a common, internal language when talking about these 3D technologies. We use these technologies to inspire innovation and creativity, and to demonstrate to our customers what a concept could be. You too can use rapid prototyping to inspire what's possible, demonstrate what a concept could be and maximize what it should be.
Rapid prototyping is fast, iterative and inexpensive. At Campbell, we use this as a build-to-learn tool to inspire internal innovation.
Functional prototyping gives you that fit, form and function of a package or part. We use this as a build-to-confirm tool to refine the details and predominantly focus on validating the performance and specifications.
Creating the soup pouch
For example, when we decided to use pouch packaging for some of our new soups, we didn't have the ability to create a physical mock-up right away. So we started using Adobe Photoshop for our early renderings to give our teams new design concepts to consider and evolve during the label development process.
We took pictures of blank pouches and then mapped graphics onto them. This allowed us to work with our teams and refine the design multiple times before we ended up with the final Campbell's Go soup packaging design. We used these renderings to look at different shelf sets using various designs. We even took the renderings to different places in the store, taking pictures of non-traditional soup shelf sets and then adding these just to see what it would look like in locations other than the soup aisle. All of this was done virtually, with collaboration between both internal and external partners.
These renderings helped to play a big part in the decision making process for us. Just like with 3D printing, you can iterate quickly and with little risk. This allowed us to incorporate internal and external consumer feedback before these packages were even created.
Finally, having a physical mock-up capability for us was one of the toughest challenges. With so many different formats out there for packaging nowadays, how could you best represent all of them?
Our solution was using pressure-sensitive labels as a cost-effective and convenient way to get graphics onto many different packaging formats. These labels gave us the ability to print eye-catching graphics on a variety of different prototypes. We can actually fill these and put them in front of consumers so they can get a feel for the physical pouches, how a bottle shape might fit in their hand or to give us feedback right away on the label design process. It's fast and affordable, much less costly than buying a high-tech printer and a pouch former to try and create these from scratch.
People say a picture is worth a thousand words. I like to say a physical mock-up is worth a million.
We use labels on paperboard as well. We're able to create die-lines and graphics, adhere these to a blank piece of paperboard and then fold it into whatever carton, tray or display we want to visualize. All of this is done without cutting dies, production print runs or separations just to get that physical mock-up in your hands—so it saves a lot of time and money.
We can use this process to create small quantities of mock-ups, but when we need larger quantities or different capabilities we look to our outside vendors and partners for help. They give us the agility we need when a job falls outside of our internal capabilities.
One of my favorite terms is what we call "Frankenstein-ing." This is where we take part of one package and part of another package, chop them all up and mix them together to see what we come out with that's new and usable. We can take 3D-printed parts and existing packages and meld them into something different—just to get the creative juices flowing. Usually we use these in small, breakout teams early in the innovation stages just to see what can potentially be possible.
Some of our Frankenstein-ed mock-ups range from combinations of metal cans and plastic 3D-printed parts, to paperboard and 3D-printed parts, and a variety of flexible and rigid packaging formats that we've "mashed up."
At the end of the day, you want to be able to maximize what's possible, inspire your consumers and validate the function as quickly and economically as possible.
Today, 3D technologies and their processes are readily accessible by all. If you're not using them in some way, shape or form, then you're behind.
John McComb is program manager of the structural packaging group in Campbell Soup Co.'s Global Research & Development organization. In this role, he is responsible for creating functional and innovative packaging concepts across aseptic, hot fill and retort platforms for soup, beverage and simple meals. Over the past five years, McComb has worked to bring a variety of in-house prototyping capabilities to Campbell, which include 3D printing, rendering, scanning and animation.
In or out?
What are the pros and cons of bringing 3D technologies in house vs outsourcing the capabilities? Are you in, are you out or are you a combination of the two? How do you decide? Some key questions to consider:
Does it make sense to invest now? Will the technologies be useful one year, two years, even three years from now? Is it worth the investment in a printer when technology is changing so quickly?
How much do you use, or would you use, these capabilities?
Which capabilities do you need and which can you live without?
Outside partnerships are important to cultivate to ensure your total capabilities are well-rounded. You can partner with outside design firms, prototyping companies and contract service groups that provide CAD operators, as well as design and industrial engineers. This approach can help lower your initial investment as well.
In or out, cost is always going to be a factor. But the benefits of having some capabilities outweigh not doing anything and miss the opportunity to be innovative.
IN-HOUSE PROS
Affordable: Some basic printing systems are as low as $300.
Speed/Agility: You can speed up the design process. What used to take days and weeks, now takes hours or even less.
Design freedom: If you do buy a machine, you'll likely find you use it 10 to 15 percent more regularly, as a general rule, now that you have the technology. For instance, now that you have the capability in house, you'll find things to print that you might not have printed before-just to experiment.
Low risk: Keeping your designs in-house enables you to better protect your intellectual property (IP).
IN-HOUSE CONS
Expensive: Printing can be costly, depending on the equipment.
Space: You'll need room for the system and materials to run on it.
Resources: You need someone to actually run the system. If you are just starting out, you can contract with someone before you actually hire them full-time to ensure they have the right capabilities. Or you can make this role part of your intern program, which Campbell has started to explore.
Maintenance/upkeep: Like any other piece of equipment, an in-house system will need support.
Limited materials: You can potentially limit yourself to just one material, based on the printer you buy.
OUTSOURCING PROS
Affordable: You pay for only what you need.
One-stop shop: Outside firms offer a range of capabilities, from designing an initial concept to printing it.
External perspective: A fresh set of eyes on your ideas can be helpful. You can forge valuable partnerships with different companies and tap into a greater range of capabilities and expertise.
Broader materials: You can try new technologies and different materials without committing to only one.
OUTSOURCING CONS
Expensive: Partnerships can be costly depending on what you buy and the services you choose.
Resources: Even if you do go completely outside, you still need someone in-house to manage the process on your end.
IP risk: There is a greater risk that you could lose proprietary info if your partners don't maintain confidentiality.
Available technologies and products
Here are some 3D printers:
• Replicator 2 from MakerBot (www.makerbot.com): This 3D printer is about $2,400 for the company's newest version. It offers a higher quality of print and a larger build window vs prior machines.
• A6LT from MakiBox (www.makibox.com): The A6LT printer starts at about $300. You can buy and add on different variations and options that will increase the price, but the base model is the least expensive printer I have found to date.
• Objet30 Pro from Stratasys (www.stratasys.com): This one machine can print seven different materials and starts at just under $20,000. Multi-material machines are starting to become more mainstream.
• Form 1 SLA from Formlabs (www.formlabs.com): This printer starts at about $3,300. I think this is the first stereo-lithography machine for the masses. It can create layers that are as thin as 25 microns, which is about 75 percent thinner than the ABS from the initial MakerBot series.
3D scanners help us to replicate models of our own designs so we don't have to redraw them from scratch. You can scan in a part and create a working CAD file with little effort upfront.
• 3D scanner from NextEngine (www.nextengine.com): This starts at just under $3,000 for the scanner, and uses partial-scan technology, which scans multiple images and sews them together for one final part.
Z Scanner 800 from Z Corp. (www.zcorp.com): This handheld scanner is just under $50,000. It eliminates the need to sew together multiple scans as with the partial-scan technology. You can walk around the part and scan it all in one piece, which can save quite a bit of time.
• Scanners from Artec 3D Scanners (www.artec3d.com): These scanners range anywhere from $15,000 to $25,000, in handheld and stationary units for both continuous and partial-scan technology.
Some companies offer 3D CAD rendering technologies that Campbell Soup Co. has recently brought in-house to help us inspire our internal and external partners:
• SpaceClaim (www.spaceclaim.com): This costs roughly $2,500 per seat. There are also subscription services and updates at additional costs. You can pretty much sketch up and free-build a part and then create 3D models from it. It lets you draw what you want, where you want it and how you want it.
• KeyShot (keyshot.com): The company has partnered with SpaceClaim for an all-in-one CAD/rendering package. This takes 3D models and you can go directly into rendering. There's an additional program you can also get with KeyShot for animation-so you can spin, explode, rotate or do whatever else you want to do with the parts. This additional package is about $500.
• Maya from Autodesk (www.autodesk.com): This is a little bit more expensive—about $4,000 or $5,000 for a seat. This rendering program can be also used for animation. You can show shelf sets, fly bys, opening packages, reclosable features and more.
• Additional programs include: Illustrator and Photoshop from Adobe (www.adobe.com). These have been around for quite some time and allow us to create realistic pictures without needing a CAD file for the original part. They can have a hand-drawn appearance or a little bit more realistic view of what you're looking for with colors and graphics.
.
About the Author(s)
You May Also Like


